So today we’re in Ottawa, Kansas. And what we’re doing is we’re doing a crack injection on a home that has some cracks from the wall moving in. They decided to do option three, which is just inject the cracks. So what we’re using is we’re using a 602 epoxy paste from CPR Products. It’s my go-to for what I do, and what it is is it’s a surface epoxy. And what we’re going to do is we’re going to put these surface ports on the crack, and then we’re going to seal the crack with the 602, so that way, when I go to inject it with the material, we’ll go over with in a minute, what’ll happen is, it’d dry and it’d keep all the material in the wall.
So, what we’re doing now is … What we did was we drilled holes with a quarter-inch bit about four inches into the crack. The reason for that is we want to make sure that when we inject the material, the material’s in the crack all the way, so as it expands, there’s enough material in there to make sure that as it expands, it seals the entire crack all the way up. So what we’re going to do now is I’m going to mix up the epoxy paste and then we’re going to set the ports so we can get the injection going.
With the epoxy that I use, it comes in black and white tubes, and it’s a one-to-one. So basically, as you mix it, it turns gray. And you want to make sure there’s no white or black streaks in it, because if there is, then it won’t dry properly, and then you’ll fail when you go to inject. So as we do it, we just use a basic cheap tile to mix it on. Then once we get it there, we’ll bring it up. And then what we do with the ports is the ports have small holes right on the surface. And what that does is as I put the material in and I go to press on the wall, the material, the epoxy will come through it. And as it comes through it, we’ll take the spatula and then we’ll seal around it. So when it bonds, it kind of makes like a grip on it, so that way, when I put any pressure on it, it won’t blow out on me.
And the one thing that I do when I go to seal it is I don’t follow the crack up, I go to the side. And the reason why I go to the side is what it does is it pushes some of the material into the crack just to give it a little extra strength. So that way, when I go to inject, it just has a little more bond, so I can give the injection gun a little more pressure to make sure I have enough in there that we won’t have any issues.
So once you get all the ports sealed and taken care of, what you want to do is you want to start from the bottom and kind of go through it one more time and make sure that you have everything sealed. And if it looks like it’s not going to be, just add more to it. That way when you do it, when you go to inject, you know for sure that you have everything isolated.
Foundation Crack Injection
So now that everything is sealed, usually takes about 30 to 40 minutes for it to fully cure and bond before we can do the injection. So what we’re going to do is we’re going to let it go, make sure that it’s completely solid. And then once we get to that point, we’ll come back and we’ll start the crack injection process.
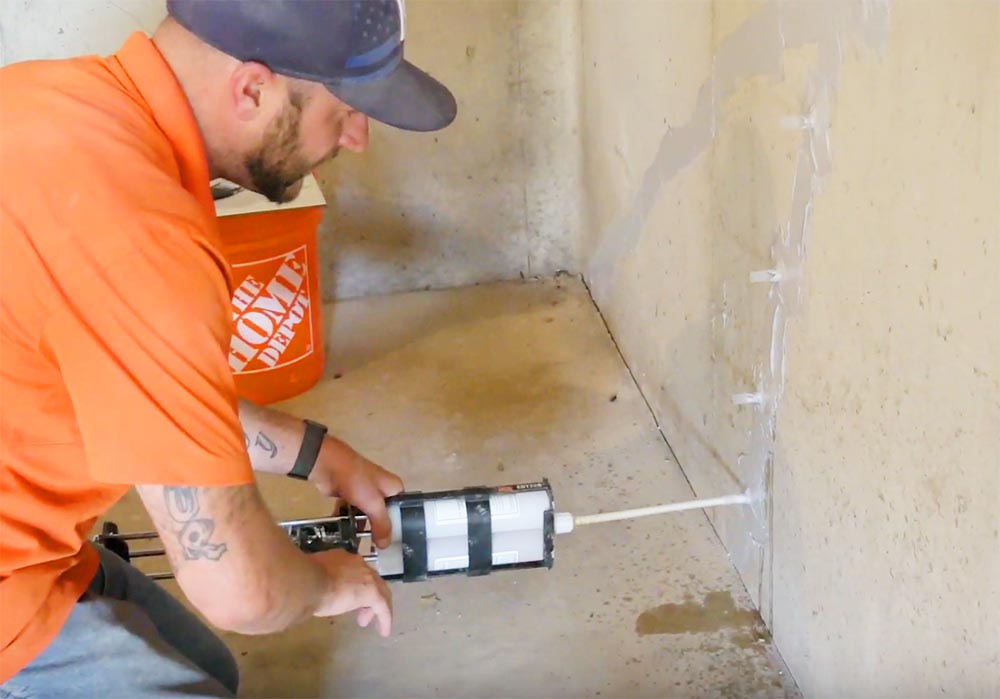
Okay, so now it’s been about 45 minutes and it is solid as a rock. Everything’s good to go. So what we’re going to do is on this particular crack, we’re using a material called 900, it’s a polyurethane resin. And the reason for it is there was water that was coming through this crack, and this is a flexible material. So as you inject it into the crack, it expands and it never gets hard. So if the wall decides it wants to breathe and move some more, because they don’t want to deal with anything else at the moment, this will give you about a quarter-inch of flexibility on the wall, inward or outward, before the crack decides that it can’t hold it anymore. There’s another product we use that’s an epoxy injection, which is more on the structural side. But on this particular case, this one is for the poly resin is the best solution right now.
So what we’re going to do is we’re just going to put it in our injection gun and get it ready. And then when we do injections, we always start at the bottom. The reason why we start at the bottom is we want to make sure that the crack is full from the bottom up. So we don’t start injecting here and just hope for the best as it runs down. So we’re going to start at the bottom and ideally what’s going to happen is we’re going to inject, and I’m going to continue to inject until, hopefully, I see material come out of the port above it. And then we do that process all the way up. And if that goes correctly, what will happen is you’ll know that the crack is full, so you know that you’ve done it correctly all the way up.
And as you see here, I’ll let it come out. Usually I don’t let it come out, but I’ll let it come out. You see where it’s coming out? So what happens is, as I injected the bottom one, it’s filled this crack all the way up and it’s pushing out of this one. So what we’ll do is we’ll come in, we will cap off the bottom port, because it’s full and then we’ll move up to the next one. And then as we do this, we just continue the process all the way up until the material is in every part of the crack.
So what you see here is the crack is all the way full and you see it coming out of the top. It looks like a mess now, but the good stuff with this material is once it gets hard or once it gets firm, you can peel it right off the wall and make it look good again. So what we’ll do is it’ll take about 10, 15 minutes to fully activate, and then we’ll come back in and we’ll clean all this up and make it look good.
So, we’re back with the crack injection after it’s had plenty of time to cure and solidify, and we could see the injection material here that’s sort of turned into this foamy kind of tacky texture. And the cool thing about this is that it doesn’t take much to take it off. So after everything dries and gets cured, we can go in and just start peeling it all off like this.
So after the cleanup and everything else goes up here on the wall, what we’re left with is a completed crack injection job. You can see that the cracks are completely covered by the sealing material here. And we have the cracks all filled and capped off with these sort of little stems and caps here. And that way we can be assured that water isn’t going to be able to come in through those cracks.
Contact KC Pier
So, thank you so much for watching. If you think that you have a problem with your foundation, or if you have any cracks in your basement, do not hesitate to give us a call, contact us on our website or follow us on socials, and we’ll see you next time.